Anyone can download from Megaupload. Just follow the steps

Helo friends..
well i had a big prob downloading fuiles from
megaupload.. but now tehre is a hack for this.
u don't have to install tat stupid toolbar nor wait for hours.
if ur a Firefox user u can download as soon as u punch the link in.
it will not ask u to download toolbar but directly take u to the code..

Here is a crack/trick for Megaupload which stops the message "All download slots... assigned to your country are in use..." from appearing while downloading a file.
Only with Firefox 2.0 (cos i have tested on mine)
Here is solution:

-Go to address bar and type: about:config

-Search for general.useragent.extra.firefox

Image

-Double click on it
-Change the default text with this: Firefox/2.0 MEGAUPLOAD 1.0
-or if you are using 2.0.0.4 version type next: Firefox/2.0.0.4 MEGAUPLOAD 1.0

Image

-Start Downloading witout any Toolbar

Image

This is so easy and within seconds u can resume ur download from Megaupload.


--------------------------------------------------------------------------
ANOTHER WAY


Working for ALL BROSWERS

Having problems with downloading from MEGADOWNLOAD site

use this trick & it is working 100%

Follow THESE instructions if you use IE

1.Go to Start and click Run, then type regedit.

2. Go to: [HKEY_LOCAL_MACHINE\SOFTW ARE\Micros oft\Windows\Curr entVersion\Internet Settings\User Agent\Post Platform]

3. Right click on Post Platform > New > String Value.

4. Keep "Alexa Toolbar" as a name for the string. Don't do anything else, or else it won't work.


This tricks the MegaUpload site into believing that you have Alexa Toolbar installed on your PC.

You better do this quickly, because MegaUpload will soon find out about this

Working for FIREFOX ONLY
------------------------- ------------------------- ------------------------- ---------
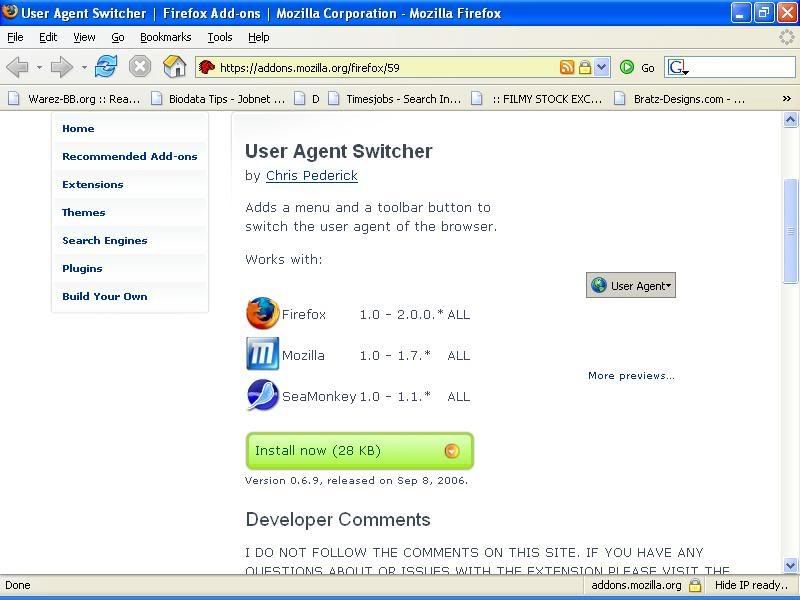
Start using Mozilla Firefox with extension : - User Agent switcher
------------------------- ------------------------- ------------------------- -

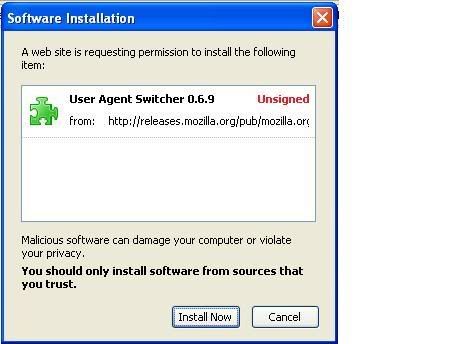
Download and install it from :


https://addons.mozilla.org/firefox/59/


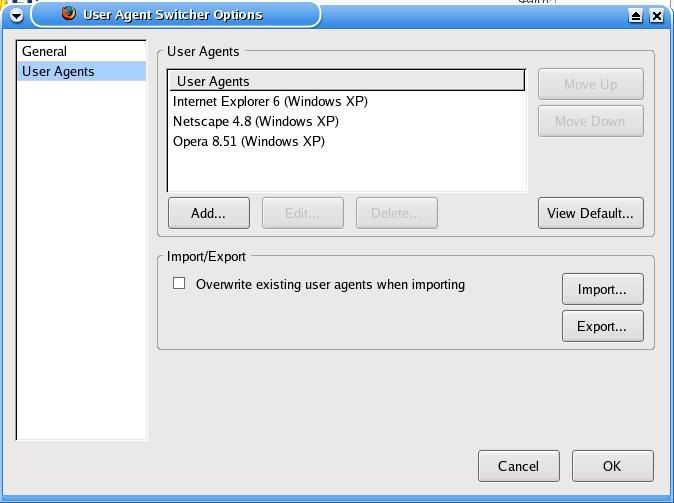
01.) Now open Firefox, go to Tools > User Agent Switcher > Options > Options
02.) In the new opened window, click on User Agents
03.) In the next window click on Add
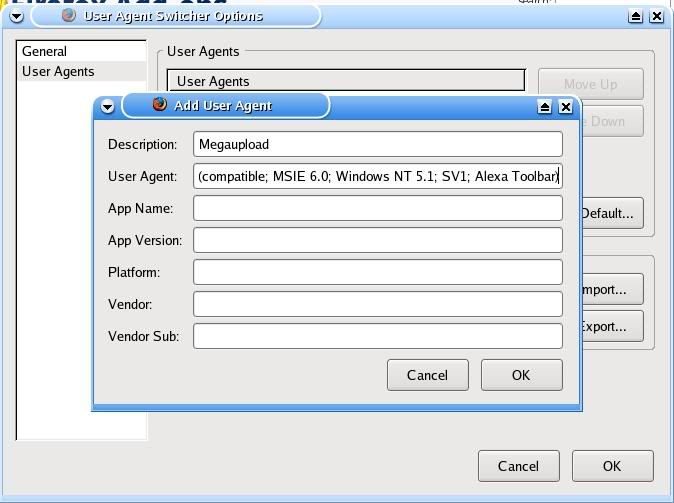
04.) In the next window type information as follows : -

Description : - MEGAUPLOAD
User Agent : -

+ Description: MEGAUPLOAD
+ User Agent: Mozilla/4.0 (compatible; MSIE 6.0; Windows NT 5.1; SV1; Alexa Toolbar)

Then Click on OK, again click on OK.


Once you have done this, open Firefox again
Go to Tools > User Agent Switcher > click on MEGAUPLOAD

Now you can enter a downlaod link in the address bar & hurray no SLOTS issue !!!!!!!

How To BackUp Your DVD's

How to Back Up Your DVD's by mcp2

First of all you will need:

- DVD Decrypter
- DVD Shrink
- DAEMON Tools


I'm assuming some of you have bought a DVD some time or another, so today you will be able to back them up. I will sub categorize the tutorial by the program you will be using at each point, this tutorial should take no longer than 2 hours MAX and will only require 15 minutes MAX input from you and the rest will be done by your computer.


FIRST, stick in your DVD in your DVD drive but don't let it play.

DVD Decrypter
-------------

DVD Decrypter does what it says on the box, it decrypts your DVD's. DVD Decrypter is one of the most used applications in DVD decypting and is liked allot by the Doom9 community. DVD Decrypter will rip right through 80% or more of copyright protected DVD's.

Open up DVD Decrypter and select your source (your DVD drive), when it has read your DVD it will tell you its region, RCE Protection and the System Protection that is on the DVD but don't worry DVD Decrypter will rip right through them. Next select your Destination, this is where the ripped copy will be placed so make sure the destination is somewhere on your hard drive. After you have selected your source and destination you will select the mode in which DVD Decrypter will rip your DVD, in this tutorial we will be using the ISO mode, to turn DVD Decrypter into ISO mode you simply click Mode >> ISO >> Read R, to complete this section of the tutorial you just have to click the image which looks like a DVD which has an arrow pointing to a hard drive and you're done. You can now eject your DVD from the drive.


DAEMON Tools
------------

DAEMON Tools is a virtualization utility that can create up to 4 virtual drives on your computer, these virtual drives can be used to play CD/DVD-ROM images in quite allot of formats including ISO, MDS and NRG.

Open up DAEMON Tools and you see nothing happens, thats because it has placed itself in bottom right hand side of your screen as an icon. We are going to mount the DVD ISO on a virtual drive, we do this by right clicking the icon the click on Virtual CD/DVD-ROM >> Device 0: [E:] No Media (the device number and drive letter could be anything), then click on Mount Image, a file browser windows pops up and from there you navigate to where your ISO image is and select it, your computer now thinks that you have placed a DVD into your DVD Drive and will want to play so just exit and you can now go onto part 3 of the tutorial where you will be using DVD Shrink.


DVD Shrink
----------

DVD Shrink is a tool that will let you re-author your DVD's, it lets you reduce the DVD file size and remove the copy protection and encryption. It reduces the DVD size to fit onto one DVD-R without any visible loss of quality.

Open up DVD Shrink. Click on the Open Disc button and select the virtual DVD drive and click OK. Now what we want to do is reduce the DVD size by re-authoring it, what we are going to do is take out some of the extra features in the DVD like the Extras and Menus so it will fit on one DVD-R. Click on the Re-author button up top an the main window should change, in this DVD we are only going to keep the main movie and nothing more. The right hand pane should be split up into 3 sections Menus, Main Movie and Extras, under Main Movie it should say Title 1, right click it and select Add and the Title 1 should be added to the left pane as well, the left pane tells you what will be on the DVD. Above the right pane there should be two buttons DVD Browser and Compression Settings, click on Compression Settings. One in the Compression Settings view click on Title 1 in the left pane and the right pane should change. The right pane right now is split into 3 sections Video, Audio and Subpicture. Video tells you what the compression rate is, Audio tells you audio streams are in the movie and Subpicture tells you what subtitles are in the movie. Now, we want to reduce the DVD size even more so we are going to untick all the subpictures and any other Audio stream that is not English, you should see that the compression rate has increased because we are removing more features from the DVD. We are finished with our editing now onto creating the ISO file. Click on the Backup button up top and a new window should pop up, this is where we change all the output options. Under "Select Backup Target" there should be a drop down menu, you can either burn the edited DVD onto a DVD, create ISO image, create ISO image and burn it with DVD Decrypter or save the DVD files (VOB's, IFO's etc.) on the hard drive, we are going to select ISO Image File. Under "Select Target Image File" there should be a browse button which should bring up a file browser window where you select your where you want to save the ISO. We are done with the file type now we have to set the DVD Region, click on DVD Region up top, the window should change and Region Free should be selected, if it's not the select and under Provider ID put your name or handle. Making the DVD Region Free will allow it to be played on any DVD player. Now we are going to edit the Quality Settings, click on the Quality Settings button up top and tick the first box and the second box, in the second box's drop down menu select "Sharp (Default)" this will increase the time it will take to transcode the DVD but will result in better quality, you may choose "Maximum Sharpness" if you wish. Next click on Options and select "Run backup in low priority mode" this is if you want to use the computer while it's backing up the DVD. We're nearlly finished now, click on Burn Settings and give the ISO a volume label or leave it how it is. Now that everything has be selected all you have to do now is click OK and it should begin to back up your DVD.

One it has finished backing up your DVD you can right click on the DAEMON Tools icon select Virtual CD/DVD-ROM >> Unmount all drives. If you want to test the ISO file, right click on the DAEMON Tools icon select Virtual CD/DVD-ROM >> Device 0: [E:] No Media >> Mount Image and navigate to the ISO file.

Now that you have seen that the ISO file is fine and working you can now burn it onto a DVD with the burning software of your choice, I recommend Nero.

P.S For some of the DVD's that can't be ripped I suggest your use DVDFab Decrypter instead of DVD Decrypter which is also free.

How to Customize Right Click Menus

Till now you simply learnt how to delete the special system folders by deleting a registry key, but the hack would have been better if there was a way of adding the DELETE and RENAME option to the right click context menus of these special folders. You can actually change the right click context menu of any system folder and add any of the following options: RENAME, DELETE, CUT, COPY, PASTE and lots more.

This hack too requires you to know the CLSID value of the system folder whose menu you want to customize. In this section, I have taken up Recycle Bin as the folder whose context menu I am going to edit.

First launch the registry editor and open the following registry key:

HKEY_CLASSES_ROOT\CLSID\{645FF040-5081-101B-9F08-00AA002F954E}\ShellFolder.

In case you want to edit some other folder like say the FONTS folder, then you will open the following key:

HKEY_CLASSES_ROOT\CLSID\{CLSID VALUE HERE}\ShellFolder.

In the right pane there will be a DWORD value names attributes. Now consider the following options:

1.To add the Rename option to the menu, change the value of Attributes to

50 01 00 20

2. To add the Delete option to the menu, change the value of Attributes to

60 01 00 20

3. To add both the Rename & Delete options to the menu, change the value of Attributes to

70,01,00,20

4. Add Copy to the menu, change Attributes to

41 01 00 20

5. Add Cut to the menu, change Attributes to

42 01 00 20

6. Add Copy & Cut to the menu, change Attributes to

43 01 00 20

7. Add Paste to the menu, change Attributes to

44 01 00 20

8. Add Copy & Paste to the menu, change Attributes to

45 01 00 20

9. Add Cut & Paste to the menu, change Attributes to

46 01 00 20

10. Add all Cut, Copy & Paste to the menu, change Attributes to

47 01 00 20

11. We want to add only the Rename option to the right click context menu of the Recycle Bin, so change the value of attributes to:

50 01 00 20

Press F5 to refresh and then after rebooting you will find that when you right click on the Recycle Bin a RENAME option pops up too.

12. To reset the default Windows options change the value of Attributes back to

40 01 00 20

The Registry File which one can create for the above process would be something like the below:

REGEDIT4
[HKEY_CLASSES_ROOT\CLSID\{645FF040-5081-101B-9F08-00AA002F954E}\Shell-Folder]
"Attributes"=hex:50,01,00,20

How to do a GIF animation

Step 1: Preparing the windows for an animation:

First open up Gimp, now go to file->New.

Make the dimensions 65x65.

Now for this tutorial I'm going to be making the image transparent.(If you don't want it transparent ignore this step)

Select the background layer and cut out the image(ctrl + x)

Step 2: Starting the animation:

Now if your animating you'll certainly need something to work with.

Open up a sprite sheet, and pick out a series of movements.
Now cut out the first pose that you'll be using, then switch over to your 65x65 image.
Now go to Layer->New Layer.

Paste the sprite in now.

Continue doing the following for the remaining sprites (in order)

Cut sprite out, switch over to animation window, make new layer then paste the sprite.

Important:You have to make the images overlap or else it will end up jerky.

Step 3: Saving it as a GIF.

Now you're ready to save it.

Warning: The following step is optional, only do it if your file size is really large!

Before you do that:

If you want to decrease file size you can do the following:

1.Filters->Animation->Optimize for Gif.
2.Image->Mode->Indexed. Now click on "Generate Optimum Palette", choose a number.(some numbers may change the colors disaplayed.)

Go to File-Save as...
Save it as a GIF.

Make sure that you have "Save as animation" checked off.

Click on export and one final window should pop up.

On this window you'll have to do a couple of things:
1.Make sure "Loop forever" is checked.(If you don't want a looped animation, don't check this)
2.Under "Frame disposal where unspecified:" scroll down and select "One frame per layer (replace)"

Doing the above will make your animation look good, and make it continually loop.

The Mother of All Error Messages

Get it here

http://support.microsoft.com/default.aspx?scid=KB;en-us;q276304

Desktop workers risk blood clots, says new study

Office workers glued to computer screens are at greater risk of deadly blood clots forming in their legs than long-distance air travellers, the author of a New Zealand study on thrombosis said on Monday.

The study’s leader, professor Richard Beasley of New Zealand’s privately funded Medical Research Institute, said the study found that 34 per cent of patients admitted to hospital with blood clots had been seated at work for long periods.

Deep vein thrombosis, or DVT, is a condition in which a blood clot forms in the deep veins of the legs. The condition can be fatal if part of the clot breaks off and blocks a blood vessel in the lungs. The condition has been linked to long-haul flights and dubbed ‘economy class syndrome’, because passengers travelling often do not have the space or the opportunity to stretch their legs enough to reduce the risk of blood clotting.

“Being seated for long periods of time... The risk (of blood clots developing in the veins of the legs) is certainly there,” Beasley said.

“There are considerably more people who are seated for long periods at work as part of their normal day than there are travelling,” he said, adding the main groups affected are workers in the IT industry and in call centres.

The study covered 62 patients under 65 years who were admitted to hospital with blood clots.

Beasley said a surprise finding was that “people are working for so long”. “We had people not uncommonly working 12 to 14 hours a day and being seated for that time,” he said.

The 34 per cent finding is far higher than the 1.4 per cent of blood clot patients from among those who recently travelled on long-haul flights.

“It’s the same thing occurring in a similar circumstances as travellers’ thrombosis,” Beasley noted.

Some reported being seated at the job for three to four hours at a stretch, “reflecting the very sedentary nature of our work at the moment”, he said. The study will be published next month in the New Zealand Medical Journal.

Courtesy : HindustanTimes

Microsoft crazy facts

MAGIC #1

Nobody can create a FOLDER anywhere on the computer which can be named as "CON".
This is something pretty cool...and unbelievable. ..
At Microsoft the whole Team, couldn't answer why this happened!
TRY IT NOW, IT WILL NOT CREATE "CON" FOLDER

MAGIC #2

This is something pretty cool and neat...and unbelievable. ..
At Microsoft the whole Team, including Bill Gates, couldn't answer why this happened!
Try it out yourself...
Open Microsoft Word and type
=rand (200, 99)
and then press ENTER


MAGIC #3

For those of you using Windows, do the following:
1. Open an empty notepad file
2. Type "Bush hid the facts" (without the quotes)
3. Save it as whatever you want.
4. Close it, and re-open it.
is it just a really weird bug?

You can try the same thing above with another sentence "this app can break"

Explanation for Magic #1:
In windows the folder name and the special system variables share the same interface, so when you create a folder with a system variable name it will consider that folder already exist!!
these special system variables are available irrespective of path
You cannot create a folder with these names also:
CON, NUL, COM1, COM2, COM3, LPT1, LPT2, LPT3,COM1 to COM9 and LPT1 to LPT9....
CON means console, COM1 means serial port 1, LPT1 means parallel port 1

Windows Tweak: Hack Your XP Start Button

Change the text and icon on your Start button by following these simple steps.

So many people requests on how to change the Windows Start button, I'm going to teach you how to hack it to pieces manually. No software required!

Before you get started, you might want to print out this page for easy reference.

Change the Start text:

First of all, make sure you download Resource Hacker. You'll need this puppy to edit resources inside your Windows shell.

Locate explorer.exe in your c:\Windows directory. Make a copy of the file in the same directory and rename it explorer.bak.

Now launch Resource Hacker. In the File menu, open explorer.exe. You'll now see a bunch of collapsed folders.

Expand the String Table folder and then find folder No. 37.

Click on resource 1033 and locate the text that says "Start." This is your Start button, and now you've got control over what it says! Change the "Start" text to your text of choice. You don't have a character limit, but the text takes up valuable taskbar space, so don't make it too long.

Click on the button labeled Compile Script. This updates the settings for your Start button.

Change your hover text:

While you're here, why not also change the text that pops up when your mouse hovers over your Start button?

Right now it says "Click here to begin." Well, duh! We already know that's where to begin!

Open folder No. 34 and click on resource 1033.

Find the text that says "Click here to begin" and change it to something cooler. Might I suggest "Click here for a good time, baby."

Click on the Compile Script button to update this resource.

Customize your Start icon:

For an added bonus, you can also change the Windows icon to the left of the text, too.

Collapse the String Table folder and expand the Bitmap folder at the top of your folder list.

Click on folder No. 143 and click on resource 1033. You should see that familiar Windows icon.

Go to the Action Menu and select "Replace bitmap." Select "Open file with new bitmap", and locate the replacement image on your machine. Note: The image must have a .bmp extension and a size of 25 pixels by 20 pixels. Then click the Replace button.

Here's the image I've been using instead of the Windows icon, in case you want to use it.

Now that you've made your changes, save the file in your Windows folder with another name, such as newstartbutton.exe. Don't name it Explorer.exe, because that file is already being used by your system. Close all open programs and restart your system.

Boot into Safe Mode With Command Prompt by pressing F8 on startup. Then choose Safe Mode in the command prompt.

Log on as administrator and enter your password.

When the command prompt comes up, make sure you're in the right directory by typing "cd c:\windows" (without the quotes).

Now type "copy c:\windows\newstartbutton.exe c:\windows\explorer.exe" (no quotes). Type "yes" (no quotes) to overwrite the existing file, then restart your system by typing "shutdown -r" (no quotes).

When Windows relaunches, you'll see your new Start button in all its glory!

Megaupload cheat Tutorial

This tut will help you clear the megaupload slot restriction.

This tut is made my me but the cheat was not found by me so credit goes to the finder.
The tut is really simple to follow and if u have any questions then plz [u]post it in this topic or pm me.
What you have to do is the following.

1. Start Firefox and go to
http://addons.mozilla.org/firefox/59


2. There, click Install and following screen will pop up:


3. click install and restart Firefox

4. Then go to this menu: Options>>>User Agent>>>Options >>> Options(*click*)>>>User Agents and you'll get a window like this:


5. Now click Add and insert following informations like on the screen:
+ Description: MEGAUPLOAD
+ User Agent: Mozilla/4.0 (compatible; MSIE 6.0; Windows NT 5.1; SV1; Alexa Toolbar)


Now all you need to do before going to megaupload is selecting the following;
Options>>>User Agents>>>Megaupload
Isn't this great

Hope you'll have fun

Enjoy your downloads.

Change Text on XP Start Button

Change Text on XP Start Button

Step 1 - Modify Explorer.exe File

In order to make the changes, the file explorer.exe located at C:\Windows needs to be edited. Since explorer.exe is a binary file it requires a special editor. For purposes of this article I have used Resource Hacker. Resource HackerTM is a freeware utility to view, modify, rename, add, delete and extract resources in 32bit Windows executables and resource files (*.res). It incorporates an internal resource script compiler and decompiler and works on Microsoft Windows 95/98/ME, Windows NT, Windows 2000 and Windows XP operating systems.

get this from h**p://delphi.icm.edu.pl/ftp/tools/ResHack.zip

The first step is to make a backup copy of the file explorer.exe located at C:\Windows\explorer. Place it in a folder somewhere on your hard drive where it will be safe. Start Resource Hacker and open explorer.exe located at C:\Windows\explorer.exe.

The category we are going to be using is "String Table". Expand it by clicking the plus sign then navigate down to and expand string 37 followed by highlighting 1033. If you are using the Classic Layout rather than the XP Layout, use number 38. The right hand pane will display the stringtable. We’re going to modify item 578, currently showing the word “start” just as it displays on the current Start button.

There is no magic here. Just double click on the word “start” so that it’s highlighted, making sure the quotation marks are not part of the highlight. They need to remain in place, surrounding the new text that you’ll type. Go ahead and type your new entry. In my case I used Click Me!

You’ll notice that after the new text string has been entered the Compile Script button that was grayed out is now active. I won’t get into what’s involved in compiling a script, but suffice it to say it’s going to make this exercise worthwhile. Click Compile Script and then save the altered file using the Save As command on the File Menu. Do not use the Save command – Make sure to use the Save As command and choose a name for the file. Save the newly named file to C:\Windows.


Step 2 – Modify the Registry

!!!make a backup of your registry before making changes!!!

Now that the modified explorer.exe has been created it’s necessary to modify the registry so the file will be recognized when the user logs on to the system. If you don’t know how to access the registry I’m not sure this article is for you, but just in case it’s a temporary memory lapse, go to Start (soon to be something else) Run and type regedit in the Open field. Navigate to:

HKEY_LOCAL_MACHINE\ SOFTWARE\ Microsoft\ Windows NT\ CurrentVersion\ Winlogon

In the right pane, double click the "Shell" entry to open the Edit String dialog box. In Value data: line, enter the name that was used to save the modified explorer.exe file. Click OK.

Close Registry Editor and either log off the system and log back in, or reboot the entire system if that’s your preference. If all went as planned you should see your new Start button with the revised text.

Find out if a game will run on your PC

Just visit here & verify whether the game will run on our PC before downloading.

http://www.systemrequirementslab.com

10 reasons why PCs crash U must Know

10 reasons why PCs crash U must Know

Fatal error: the system has become unstable or is busy," it says. "Enter to return to Windows or press Control-Alt-Delete to restart your computer. If you do this you will lose any unsaved information in all open applications."

You have just been struck by the Blue Screen of Death. Anyone who uses Mcft Windows will be familiar with this. What can you do? More importantly, how can you prevent it happening?

1 Hardware conflict

The number one reason why Windows crashes is hardware conflict. Each hardware device communicates to other devices through an interrupt request channel (IRQ). These are supposed to be unique for each device.

For example, a printer usually connects internally on IRQ 7. The keyboard usually uses IRQ 1 and the floppy disk drive IRQ 6. Each device will try to hog a single IRQ for itself.

If there are a lot of devices, or if they are not installed properly, two of them may end up sharing the same IRQ number. When the user tries to use both devices at the same time, a crash can happen. The way to check if your computer has a hardware conflict is through the following route:

* Start-Settings-Control Panel-System-Device Manager.

Often if a device has a problem a yellow '!' appears next to its description in the Device Manager. Highlight Computer (in the Device Manager) and press Properties to see the IRQ numbers used by your computer. If the IRQ number appears twice, two devices may be using it.

Sometimes a device might share an IRQ with something described as 'IRQ holder for PCI steering'. This can be ignored. The best way to fix this problem is to remove the problem device and reinstall it.

Sometimes you may have to find more recent drivers on the internet to make the device function properly. A good resource is www.driverguide.com. If the device is a soundcard, or a modem, it can often be fixed by moving it to a different slot on the motherboard (be careful about opening your computer, as you may void the warranty).

When working inside a computer you should switch it off, unplug the mains lead and touch an unpainted metal surface to discharge any static electricity.

To be fair to Mcft, the problem with IRQ numbers is not of its making. It is a legacy problem going back to the first PC designs using the IBM 8086 chip. Initially there were only eight IRQs. Today there are 16 IRQs in a PC. It is easy to run out of them. There are plans to increase the number of IRQs in future designs.

2 Bad Ram

Ram (random-access memory) problems might bring on the blue screen of death with a message saying Fatal Exception Error. A fatal error indicates a serious hardware problem. Sometimes it may mean a part is damaged and will need replacing.

But a fatal error caused by Ram might be caused by a mismatch of chips. For example, mixing 70-nanosecond (70ns) Ram with 60ns Ram will usually force the computer to run all the Ram at the slower speed. This will often crash the machine if the Ram is overworked.

One way around this problem is to enter the BIOS settings and increase the wait state of the Ram. This can make it more stable. Another way to troubleshoot a suspected Ram problem is to rearrange the Ram chips on the motherboard, or take some of them out. Then try to repeat the circumstances that caused the crash. When handling Ram try not to touch the gold connections, as they can be easily damaged.

Parity error messages also refer to Ram. Modern Ram chips are either parity (ECC) or non parity (non-ECC). It is best not to mix the two types, as this can be a cause of trouble.

EMM386 error messages refer to memory problems but may not be connected to bad Ram. This may be due to free memory problems often linked to old Dos-based programmes.

3 BIOS settings

Every motherboard is supplied with a range of chipset settings that are decided in the factory. A common way to access these settings is to press the F2 or delete button during the first few seconds of a boot-up.

Once inside the BIOS, great care should be taken. It is a good idea to write down on a piece of paper all the settings that appear on the screen. That way, if you change something and the computer becomes more unstable, you will know what settings to revert to.

A common BIOS error concerns the CAS latency. This refers to the Ram. Older EDO (extended data out) Ram has a CAS latency of 3. Newer SDRam has a CAS latency of 2. Setting the wrong figure can cause the Ram to lock up and freeze the computer's display.

Mcft Windows is better at allocating IRQ numbers than any BIOS. If possible set the IRQ numbers to Auto in the BIOS. This will allow Windows to allocate the IRQ numbers (make sure the BIOS setting for Plug and Play OS is switched to 'yes' to allow Windows to do this.).

4 Hard disk drives

After a few weeks, the information on a hard disk drive starts to become piecemeal or fragmented. It is a good idea to defragment the hard disk every week or so, to prevent the disk from causing a screen freeze. Go to

* Start-Programs-Accessories-System Tools-Disk Defragmenter

This will start the procedure. You will be unable to write data to the hard drive (to save it) while the disk is defragmenting, so it is a good idea to schedule the procedure for a period of inactivity using the Task Scheduler.

The Task Scheduler should be one of the small icons on the bottom right of the Windows opening page (the desktop).

Some lockups and screen freezes caused by hard disk problems can be solved by reducing the read-ahead optimisation. This can be adjusted by going to

* Start-Settings-Control Panel-System Icon-Performance-File System-Hard Disk.

Hard disks will slow down and crash if they are too full. Do some housekeeping on your hard drive every few months and free some space on it. Open the Windows folder on the C drive and find the Temporary Internet Files folder. Deleting the contents (not the folder) can free a lot of space.

Empty the Recycle Bin every week to free more space. Hard disk drives should be scanned every week for errors or bad sectors. Go to

* Start-Programs-Accessories-System Tools-ScanDisk

Otherwise assign the Task Scheduler to perform this operation at night when the computer is not in use.

5 Fatal OE exceptions and VXD errors

Fatal OE exception errors and VXD errors are often caused by video card problems.

These can often be resolved easily by reducing the resolution of the video display. Go to

* Start-Settings-Control Panel-Display-Settings

Here you should slide the screen area bar to the left. Take a look at the colour settings on the left of that window. For most desktops, high colour 16-bit depth is adequate.

If the screen freezes or you experience system lockups it might be due to the video card. Make sure it does not have a hardware conflict. Go to

* Start-Settings-Control Panel-System-Device Manager

Here, select the + beside Display Adapter. A line of text describing your video card should appear. Select it (make it blue) and press properties. Then select Resources and select each line in the window. Look for a message that says No Conflicts.

If you have video card hardware conflict, you will see it here. Be careful at this point and make a note of everything you do in case you make things worse.

The way to resolve a hardware conflict is to uncheck the Use Automatic Settings box and hit the Change Settings button. You are searching for a setting that will display a No Conflicts message.

Another useful way to resolve video problems is to go to

* Start-Settings-Control Panel-System-Performance-Graphics

Here you should move the Hardware Acceleration slider to the left. As ever, the most common cause of problems relating to graphics cards is old or faulty drivers (a driver is a small piece of software used by a computer to communicate with a device).

Look up your video card's manufacturer on the internet and search for the most recent drivers for it.

6 Viruses

Often the first sign of a virus infection is instability. Some viruses erase the boot sector of a hard drive, making it impossible to start. This is why it is a good idea to create a Windows start-up disk. Go to

* Start-Settings-Control Panel-Add/Remove Programs

Here, look for the Start Up Disk tab. Virus protection requires constant vigilance.

A virus scanner requires a list of virus signatures in order to be able to identify viruses. These signatures are stored in a DAT file. DAT files should be updated weekly from the website of your antivirus software manufacturer.

An excellent antivirus programme is McAfee VirusScan by Network Associates ( www.nai.com). Another is Norton AntiVirus 2000, made by Symantec ( www.symantec.com).

7 Printers

The action of sending a document to print creates a bigger file, often called a postscript file.

Printers have only a small amount of memory, called a buffer. This can be easily overloaded. Printing a document also uses a considerable amount of CPU power. This will also slow down the computer's performance.

If the printer is trying to print unusual characters, these might not be recognised, and can crash the computer. Sometimes printers will not recover from a crash because of confusion in the buffer. A good way to clear the buffer is to unplug the printer for ten seconds. Booting up from a powerless state, also called a cold boot, will restore the printer's default settings and you may be able to carry on.

8 Software

A common cause of computer crash is faulty or badly-installed software. Often the problem can be cured by uninstalling the software and then reinstalling it. Use Norton Uninstall or Uninstall Shield to remove an application from your system properly. This will also remove references to the programme in the System Registry and leaves the way clear for a completely fresh copy.

The System Registry can be corrupted by old references to obsolete software that you thought was uninstalled. Use Reg Cleaner by Jouni Vuorio to clean up the System Registry and remove obsolete entries. It works on Windows 95, Windows 98, Windows 98 SE (Second Edition), Windows Millennium Edition (ME), NT4 and Windows 2000.

Read the instructions and use it carefully so you don't do permanent damage to the Registry. If the Registry is damaged you will have to reinstall your operating system. Reg Cleaner can be obtained from www.jv16.org

Often a Windows problem can be resolved by entering Safe Mode. This can be done during start-up. When you see the message "Starting Windows" press F4. This should take you into Safe Mode.

Safe Mode loads a minimum of drivers. It allows you to find and fix problems that prevent Windows from loading properly.

Sometimes installing Windows is difficult because of unsuitable BIOS settings. If you keep getting SUWIN error messages (Windows setup) during the Windows installation, then try entering the BIOS and disabling the CPU internal cache. Try to disable the Level 2 (L2) cache if that doesn't work.

Remember to restore all the BIOS settings back to their former settings following installation.

9 Overheating

Central processing units (CPUs) are usually equipped with fans to keep them cool. If the fan fails or if the CPU gets old it may start to overheat and generate a particular kind of error called a kernel error. This is a common problem in chips that have been overclocked to operate at higher speeds than they are supposed to.

One remedy is to get a bigger better fan and install it on top of the CPU. Specialist cooling fans/heatsinks are available from www.computernerd.com or www.coolit.com

CPU problems can often be fixed by disabling the CPU internal cache in the BIOS. This will make the machine run more slowly, but it should also be more stable.

10 Power supply problems

With all the new construction going on around the country the steady supply of electricity has become disrupted. A power surge or spike can crash a computer as easily as a power cut.

If this has become a nuisance for you then consider buying a uninterrupted power supply (UPS). This will give you a clean power supply when there is electricity, and it will give you a few minutes to perform a controlled shutdown in case of a power cut.

It is a good investment if your data are critical, because a power cut will cause any unsaved data to be lost.

How to view deleted Youtube Videos

Will the companies never learn? How much sense does it make to keep a video that was deleted at Youtube on the hard drive? Youtube apparently does this with some videos and it is possible to call them directly using a nice script that I found at Delutube.

The system for the end user is pretty straightforward. You supply an id of a Youtube video that has been deleted and the site tries to pull it from Youtube and display it in a viewer.

It also adds download possibilities which is a nice add-on. A second possibility lets you view random deleted videos right at Delutube. Most videos that I watched had some bikini babes and booty shaking in them but there where also some sports and other kinds of videos available. It could be considered not surfer friendly in some countries but it should be fine for most.

So, if you ever come upon the dreaded “This video is no longer available” grab the id from the Youtube page and try loading it with Delutube. This does not work all the time, if it does not Delutube displays a message in the download box saying so. Videos get probably deleted physically as well after a period of time.

http://youtube.infamousx.com/

Speed Up Youtube Videos

SpeedBit Video Accelerator makes Youtube videos stream faster and play smoother. It a small software which uses the same technology as used by download accelerators.

speeding youtube videos by using speedbit video accelerator

All you need to do is install this software and everything will be set for you to watch Youtube videos faster. It shows a small window on the right bottom side showing that the video is being accelerated every time you’ll watch Youtube videos. wink

Not only that, it also allows you to search Youtube videos as well. It also keeps track of your 10 recent Youtube videos which have been accelerated, in case you want to replay them.

It speeds up the downloading of Youtube videos by downloading various chunks of videos simultaneously allowing the faster loading and viewing of Youtube videos.

speedbit video accelarator

By speeding up Youtube videos, it saves time and reduces the freezing and buffering problem in Youtube videos. SpeedBit Video Accelerator makes it possible to view the video without any buffering or freezing problems even if they are embedded in your blog or in Myspace.

And just in case you’re wondering it allows faster playback in Internet Explorer than Firefox.  But, it can accelerate the videos up to 5 times than normal viewing. So what are you waiting for?

Get it now.

Via gHacks

Stop Autoplay and Ads for Youtube Videos

TubeStop is a Firefox extension which stops the autoplay feature of the Youtube videos. If you're on dial-up, you can instantly recognize the significance of this extension. Imagine you want to watch various Youtube videos one by one, and have opened them in your browser. By default, Youtube videos start playing as the web page is opened, but using this extension the videos doesn't start playing unless you tell them to.

Even if you've multiple Youtube videos opened in the background, they'll not start playing at once. Further more, it also disables the automatic playing of the Youtube videos embedded in other web-pages/websites such as Myspace etc.

Removes Youtube Video Ads

It also disables the Youtube ads which are being displayed in Youtube videos. It simply strips the ads off. So anyone, who wants Youtube videos to play when they want or who doesn't likes to watch ads in the videos.

Video Manager for Firefox

YouPlayer is a Firefox extension which doesn't only lets you play and view videos but also save the URLs as a play list in Firefox. The play list includes URLs which has a video embedded in it.

It supports videos from YouTube, Google Video, Metacafe or MySpace. Just drag the URL link from the address bar into the playlist and the URL will be added into the playlist.

You can drag and drop a video link to a browser window or tab or right-click it and have it opened in a new tab. You can also add/drag other links, thus the playlist will work as a bookmarker.

Further more, you can also download the videos. Just right-click it on the playlist and select 'download'. So in short, here are its features:

  1. Drag and drop playlist creation
  2. Instant video download!
  3. Easy playlist editing/saving
This is a must for a video-site fan

Using Gmail as a Drive in Windows

Gmail recently increased their storage space to a massive 4GB. This of course is nothing compared to the current storage capacity of the hard disk drives, but what if you could use Gmail as an online data storage facility? For an online storage facility, it can do wonders.

Using Gmail as a Drive in Windows

Most of the companies offering online storage charge some fees for their facility, and Gmail also offers a massive 400 Gigabytes of storage which would cost $500 per year. But most users like me will be happy to use that massive 4GB of online storage facility for free. You can even save your important files and backups on Gmail.

You can use the Gmail Drive Extension (which of course is a freeware) to use Gmail as a drive in Windows and instantly store and retrieve files from your Gmail account like it was a normal drive on your Windows.

I use it to backup important data, not as my main backup location but a secondary one. All files that are stored on the drive are accessible on the Gmail website as well which means it is also possible to store files that you work with on different computers.

Download Gmail Drive Extension

How to Search GMail Effectively and Easily

Everyone knows that GMail is the best web based email solution. It offers a massive 2GB+ of email storage. Searching for a particular email can be tough especially if you've vast quantity of emails in your inbox, draft, and send folder.

Easily and Effectively Search Gmail using GMail seatch Syntax

Here are the search syntax you can use to easily search emails in GMail:

1. from:

Allows you to find an email which has been sent by a specific email address. For example, from:(theghostintheshell@gmail.com) will search for email sent to you from the theghostintheshell@gmail.com email address.

2. to:

Allows you to find an email which has been sent to a specific email address. For example, to:(theghostintheshell@gmail.com) will search for email sent by you to the theghostintheshell@gmail.com email address.

3. subject:

Allows you to find an email which has specific subject. For example, subject:"Let's play tonight!" will search for all emails with the subject "Let's play tonight!".

4. has:

Allows you to search for a emails having attachment(s). Usage: has:attachment.

5. filename:

Finds messages with an attachment filename matching a provided pattern. Used with just a file extension (e.g., pdf or txt), filename: turns up all messages with attachments of a particular type.

filename:hello.txt

filename:pdf

6. in:

Returns a list of messages in a particular collection (read: folder). Acceptable values for in: are inbox, trash, spam and everywhere (trash and spam are not included in searches unless explicitly included using in:trash, in:spam or in:anywhere) Oddly enough, sent isn't a usable value for in:.

in:inbox

in:anywhere

etc...

Happy Searching!

Design by Dzelque Blogger Templates 2007-2008