Who else wants to know how to safely edit, restore, and backup Windows’ Registry?

What is Windows Registry?

Windows Registry is the database where Windows stores the configuration settings. These settings determine how the Windows XP appears and how it behaves. The settings for most of the installed applications are also stored in the registry as well.

Why is it important?

If the registry fails, Windows XP fails. But there is nothing to fear, if you can successfully restore the registry and you know what you are changing. Before editing any part of the registry it is advisable to do a backup of the setting that you want to change and in case of any problems later on you can easily revert back the settings.

Starting Registry Editor

You can use the Registry Editor to add or change the registry settings. You can run Registry Editor as:

  • Go to Start->Run.
  • Type regedit and press Enter to run the Registry Editor.

Structure of the Registry Editor

If you are familiar with Windows Explorer then understanding the structure of the Registry Editor will be a lot easier.

registry editor keys, folders, and editing values

First there are keys. Any key can have sub keys. Think of keys like folders. Sub keys are like sub folders. Each key contains one or more values. Think of values like files. A value's name is similar to a file's name. There are three properties for the value, they are value name which appears first, then its type, then the data. In order to change any value's data simple double click it.

Adding Keys or Values

The only reason you would create keys and values is if you were instructed to do so; that is, you know adding the value will have some effect. To create a new key,

  • First click the key under which you want to create a sub key.
  • Click Edit from the menu.
  • Select New and Key.
making and adding new values and keys in the registry editor
  • Then type a name for the new key.

In order to backup any of the keys or values do this:

  • Go to the key that you want to back in the Registry editor. (To open registry editor Type "regedit" without quotes in Run and press Enter.)

  • Right Click on the key (folder) and choose Export from the menu.

  • Specify a filename which is easy to remember the settings it saved and save the file.
backing up the registry settings

In order to restore the settings:

  • Simply locate the file that saved and Run (Double-Click) it.
  • Make sure to choose yes.
  • You are done.
restore back the registry settings

Since I'm planning to write few tips and tricks by using the registry editor, so I thought an introduction would be nice.

Automatically End Task of Hung application in Windows XP

The following registry hack allows for automatically killing a task if it becomes unresponding. This is a quite useful trick since every now and then some application does become un-responding.

Make sure to backup your registry before trying to edit the registry. Follow the procedure:


    Start Registry Editor. (Start->run->"regedit")
  • On the left, navigate to,

HKEY_CURRENT_USER\Control Panel\Desktop


  • Create a new DWORD entry or alter the value, named "AutoEndTasks" and set its value as 1.

  • Create a new DWORD entry or alter the value, named "HungAppTimeout" and set its value as 1000.

  • Create a new DWORD entry or alter the value, named "WaitToKillAppTimeout" and set its value as 1.

  • Exit registry editor.

Now every time an application becomes un-resposnding it will automatically be killed.

Save Time When Copying Mutiple Files

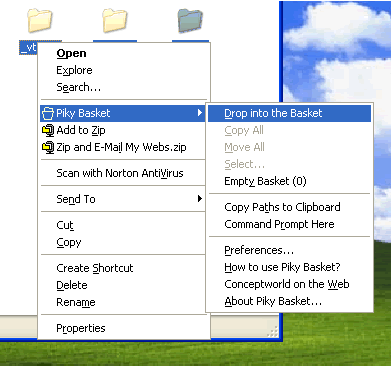
When copying files if they are located at different folders (places), going to each folder, copying files and then pasting in the destination is one hefty task. Piky Basket is one handy utility which extends the default copy paste functionalities of Windows.

save time when copying or moving files in windows

Using Piky Basket, you can put the files in a virtual basket, and then paste them in the destination. It makes organizing the files easier, you can just right click on the files, add them to the virtual basket, and then paste them in one go. This is a great time saver when you're selecting files for backup, or sharing or to burn them on CD etc.

It reduces the repetitive tasks when copying or moving files and folders in Windows. You can also copy folders/files path on the clipboard and paste them in text file. You can even launch the command prompt from any folder. Since it gets integrated within Windows and works from the shell, it doesn't use any resources.

In fact, you don't even need to run it as a separate program. It is a must for everyone.

How to install an compressed game

Ok....this is to know how to install Cabelas African Safari................First Join all the downloaded files..........now just open it using winrar or 7zip...........
-U get arount 43 files........
-Select all the 43 files.......
-right click on 1st File and select extract files as shown below :-

Here we are extracting all the 43 files..........


Here u can see the folder [cabelas african] formed.............

Here u can see the folder [cabelas african] formed.............


-These are the contents formed after extracting,..... in the folder [ cabelas african]
-Now right click on the file "Rituel" and select extract files as shown below:-


Now click ok as shown below..............


-This is how extraction is done...................

--Now a new folder is formed called as "Rituel" as shown below...........


-open "rituel"....the contents of "Rituel" is shown below...........

-select Setup.bat.......and press enter.............
-This setup.bat installs everything...............installation is shown below...in the image....
-It takes around more than 45 minutes....to de compress...........
This install everything
-After decompression is over.........go to Folder "Rituel"...then go to folder "Bin".....
-Ther u can see a icon "CAS"....run it ..........the game starts.........njoyyyy........

Convert X To DVD Tutorial

Step 1

Tutorial

This is the main ConvertXToDVD windows. May seem a little too basic now but you'll soon see how efficient it can be. For the beginning lets go to Settings -> General.

Step 2

Tutorial

What we will set here is the working folder, which is the folder that ConvertXToDVD will save the DVD files before burning them to a DVD. Make sure that the drive that the folder is in has at least 5GB free and set the working folder. (1) We will set the rest of the settings in the next steps, so for now click OK. (2)

Step 3

Tutorial

We are back to the main windows and its time to add some file to our DVD. Click the add button and select the file or files you want to convert.

Step 4

Tutorial

The files are now added as you see, however we will deal with their settings later. First comes the DVD's menu. Click the little cross (1) to reveal all options for the Menu item. Lets see the options one by one. First you can set the DVD title that will appear on the top of the menu by double-clicking on it (2) and setting the name (3). Next, you can set the background image by double clicking on Background and select the image you want to use (there are many nice one in ConvertXToDVD's folder and you can use any of your own pictures you want).

Auto start playback will auto-begin playing the first video when you enter the DVD in the player instead of showing the menu, Loop playback can be used if you want the DVD to repeat playback indefinitely by default and Sequential playback will play all videos in a row instead of returning back in the menu. The two font settings can be used to set the font and size of the menu's Title and Items.

Step 5


Tutorial

Right next comes the video properties. First you can see that the audio of each video has been automatically imported (1) as ConvertXToDVD supports almost all formats. But you can also add you own audio (for example commentary) by right-clicking on Audio and selecting Add Audio Channel. You can also click on each audio channel and set the language. Then we move to the subtitle settings. Right click on 0 Subtitle Stream and select Add Subtitle Channel (2) in order to add as many subtitle streams as you like. After you add them you can set the language and font size settings. Please note that if the subtitles are in the same desktop and have the same filename as the video they'll be automatically added. Finally you can review the Chapters and add more if you like as well as change the Menu text which is what will appear in the main menu as the title of this video. Follow the same steps to configure all your videos and move to the next step.

Tip If some cases when working with Matroska (.mkv) files that include subtitles, ConvertXToDVD may fail to load them. You can easily solve this by extracting the subtitles from the .mkv file and add them in your DVD the way shown above. If you wonder how you can achieve that just read this guide and you are set!

Step 6

Tutorial

We are finally ready to convert. You may want of course to preview your DVD before you start converting. To do that click the Preview button (1) and you can take a look at the whole DVD, including the menus. When you decide you are satisfied with the result click Convert (2) to start the converting process! Make sure you put an empty DVD in your DVD burner drive as well.

Step 7

Tutorial

When the conversion has finished a window like this will pop-up where you can select some settings about the burning (1) and change the volume name (2). When you are done click Burn (3). Keep in mind that this window will only be open for about 30secs since the conversion finishes and if you are not around it will start burning the DVD automatically so you don't really have to worry about this step as the default settings are fine.

Step 8

Tutorial

Finally burning finishes and your new DVD is ready for your player!

How To Reset iPhone & iTouch

iPhone

If you own a Apple iPod, iPhone or iTouch you may encounter the rare but irritating device freeze, there could be several reasons for such freeze, the very first step you should take is to try and reset/restart the device and see if it works, use the following method to reset your apple devices:

1. Reset iPhone & iTouch - Press and hold Sleep/Wake button and Home button at the same time (see image below) for at least ten seconds, until the Apple logo appears on the screen.
iPhone

Learn how to reset or restart iPod following a freeze

ipod
Important: If your iPod is frozen or won't turn on, it may be because iPod is paused or the Hold switch is in the locked position. If so, a lock symbol appears on the screen. Slide the Hold switch to the unlocked position and check the screen.

"If the iPod displays shows any of the following messages you should eject the iPod from within iTunes instead of resetting it:"

* Connected. Eject before disconnecting
* Sync in Progress. Please wait...
* Do not disconnect

If your iPod is frozen or won't turn on, the steps to reset it vary by model. You can easily tell which iPod model you have if you're not sure.
To reset an iPod with a Click Wheel, including:

* iPod nano (3rd generation)
* iPod classic
* iPod (5th generation)
* iPod nano (2nd generation)
* iPod nano
* iPod with color display (iPod photo)
* iPod (Click Wheel)
* iPod mini
* iPod mini (2nd generation)

1. Toggle the Hold switch on and off. (Slide it to Hold, then turn it off again.)
2. Press and hold the Menu and Center (Select) buttons simultaneously until the Apple logo appears, about 6 to 8 seconds. You may need to repeat this step.

Tip: If you are having difficulty resetting your iPod, set it on a flat surface. Make sure the finger pressing the Select button is not touching any part of the click wheel. Also make sure that you are pressing the Menu button toward the outside of the click wheel, and not near the center.
If the above steps did not work, try connecting iPod to a power adapter and plug the power adapter into an electrical outlet, or connect iPod to your computer. Make sure the computer is turned on and isn't set to go to sleep.
To reset iPod, iPod (scroll wheel), iPod (touch wheel), and iPod (dock connector)

1. Toggle the Hold switch on and off. (Slide it to Hold, then turn it off again.)
2. Press and hold the Play/Pause and Menu buttons simultaneously until the Apple/iPod logo appears, about 6 to 8 seconds. You may need to repeat this step.

If the above steps did not work, try connecting iPod to a power adapter and plug the power adapter into an electrical outlet, or connect iPod to your computer. Make sure the computer is turned on and isn't set to go to sleep.

If you are still unable to reset your iPod, use only one finger from one hand to press the Center (Select) button, and one finger from the other hand to press the Menu button.

When you reset iPod all your music and files are saved, but some customized settings may be lost. Date and time is preserved (unless the iPod reset itself because it had no power and then was reconnected to power). Other customized settings, such as Bookmarks, On-The-Go Playlists, Shuffle, Backlight timer, and so forth are preserved from the last time the hard drive turned on.

Design by Dzelque Blogger Templates 2007-2008